Some time ago a friend and I decided to try our hand at cheese making and attended a class run by Black Pearl Epicure making feta and mozzarella - it was a great experience, but I have to say we were slightly overwhelmed by the science and equipment involved in the cheese making process. We were also disappointed to find our mozzarella did not turn out as planned.
Determined to have another go we went halves in a Mad Millie Fresh Cheese Kit at last year's Good Food & Wine Show. All that wine tasting gave us the confidence we needed!
The kit is designed for beginners and makes up to 7kg of fresh cheese including feta, haloumi, cream cheese, cottage cheese and quark.
The kit includes: recipe book, butter muslin cloth, salt, mixed herbs, square moulds, iodophor sterilizer, mesophillic starter culture, rennet tablets, thermometer, cheese mat, calcium chloride, pipette, and enzyme measuring spoons.
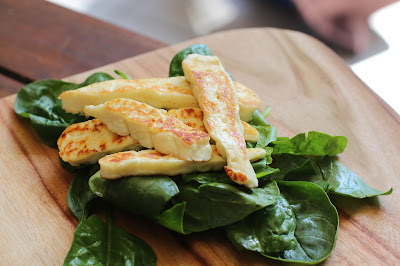
We decided to make haloumi, one of my favourites, a mouth watering Greek cheese eaten after grilling lightly on each side.
The kit made the challenge of sourcing all the equipment required much easier, however, despite the fact the kit says "contains everything you need" we found we also needed the following: saucepan - to hold 4L of milk, large tub or sink to insulate the saucepan of milk, large flat knife, slotted spoon, colander, bowl that fits inside the colander to press the cheese, 4L of milk un-homogenised and ideally organic.
A quick note on the milk - traditionally goat's milk is used for haloumi but we could only get cow's milk and it worked fine. The freshest possible milk is required for cheese making with little processing, so it's best to buy local, un-homogenised and organic. If you're in Queensland Barambah Organics or Maleny Gold Top are suitable. If you buy your milk straight from a farm or have your own supply you will need to pasteurise the milk to kill all potentially harmful bacteria.
Let's begin!
First things first - sterilise all equipment with iodine solution, it's good to keep a bucket with this solution and another with water to clean and rinse as you go.
Next step is to bring the milk to 45°C - add the milk to the large saucepan and place in a sink or insulated tub filled with hot water. We stirred the milk and continued to add boiling water to the surrounding water bath. After about 30 minutes the milk finally reached 45°C. You can do this on the stove top but if you don't have a proper incubator in might be hard to maintain the temperature once it's reached 45°C.
Now the science part - we added 2ml calcium chloride (ensures you get a good strong curd and higher yield of cheese) and 2 tablets dissolved rennet (enzymes which speed up the process of forming curds and whey).
Then we had to wait 45 minutes and keep the milk at 45°C. Surprisingly the temperature did not drop and we only added more boiling water once. I can imagine in winter this might be more difficult.
Next we had to make a clean break - a cheese making term for when the milk has set enough to be formed into cheese. To assess this, insert a knife into the milk and lift upwards at an angle, the curds should break cleanly around the knife, while the whey rushes into the middle.
If set the next step involves cutting the curd into small cubes, the size of the cubes depends on the cheese and determines its moisture level. After cutting the curds left to right and diagonally we stirred to curds for 10 minutes.
Next scoop curds into a butter muslin cloth lined colander and add a weight (we used a bowl filled with water). Leave for 30 minutes to 1 hour until rubbery and firm.
Cut cheese into blocks and add to boiling water. Once haloumi floats it's ready, about 5-10 minutes. Place on cheese mat to cool. Then you can add salt and herbs as desired. To serve slice haloumi into strips and lightly grill or pan fry on both sides. That's the best thing about fresh cheeses you can reap the rewards almost immediately after all your hard work.
One day we will attempt to make a hard cheese such as cheddar or parmesan but this will take a lot of patience.
I love the romance of making your own food from scratch, and wish I had more time to do it, doesn't everyone? For now it will do as a weekend project!
Happy cheese making, I hope this picture of fresh homemade haloumi inspires you.

I like the fact I reaped the benefits immediately without doing anything.
ReplyDeleteThe haloumi was spectacular, to bad it was gone far too soon.
I like the fact I reaped the benefits immediately without doing anything.
ReplyDeleteThe haloumi was spectacular, to bad it was gone far too soon.
This comment has been removed by a blog administrator.
ReplyDeleteWhat a great write up Elise! You're spot on about the kit, when it came to it there was a lot missing and the instructions were a bit vague, but just having the kit was the confidence we needed to get started :)
ReplyDeleteI can't wait for the next cheese making session on Sunday!
Paul is right about the immediate satisfaction. And the immediate panicked phone calls about whether there is any left!!
That photo is making me salivate...